Your first domain Step 5 of 35
Publish the DNS records
The setup wizard's steps, hosted or self-managed records, where to add them, and sharing the records with whoever edits your DNS.
Updated
Monitoring needs one thing in DNS: a DMARC record that sends reports to your organisation’s report address. The setup wizard works that record out from what the domain already publishes, does the same for SPF, and gives you exactly what to publish.
The wizard opens when you add a domain. To open it later, choose Set up in the domain’s row on the Domains page, or Run the setup wizard on its DNS records tab. It needs the Admin or Owner role.
1. Current records
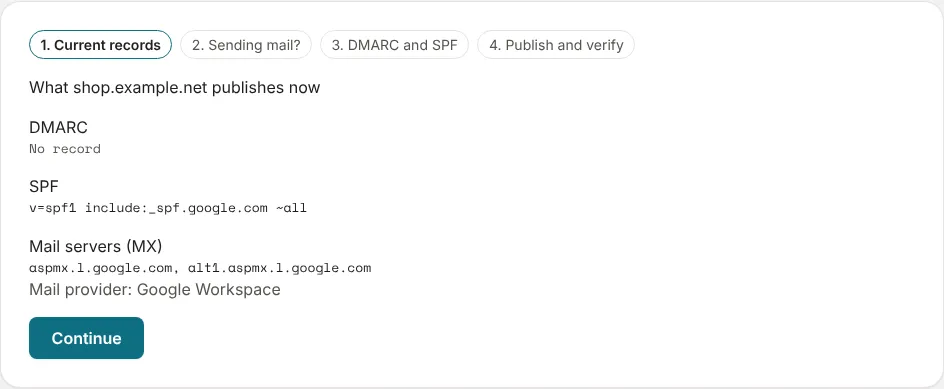
The wizard reads the domain’s DMARC and SPF records and its mail servers (MX), and names the mail provider when it recognises it. Anything wrong with an existing record is listed under it. Choose Continue.
2. Sending mail?
Does the domain send email? Answer Yes, it sends mail for any domain your staff or your services send from. If the domain has no mail servers and no SPF senders, the wizard says it looks parked. No, it’s parked offers the lockdown instead; see Lock down a parked domain.
3. DMARC and SPF
For each record, choose How is this record managed?
- Hosted: you publish one CNAME (DMARC) or one include (SPF) once, and we publish every later change for you. Each enforcement step is then a click rather than a DNS change. See Hosted records.
- Self-managed: we give you the exact record and check it’s published. You make every later change at your DNS host.
If hosting isn’t in your plan, the hosted option says so and self-managed is chosen.
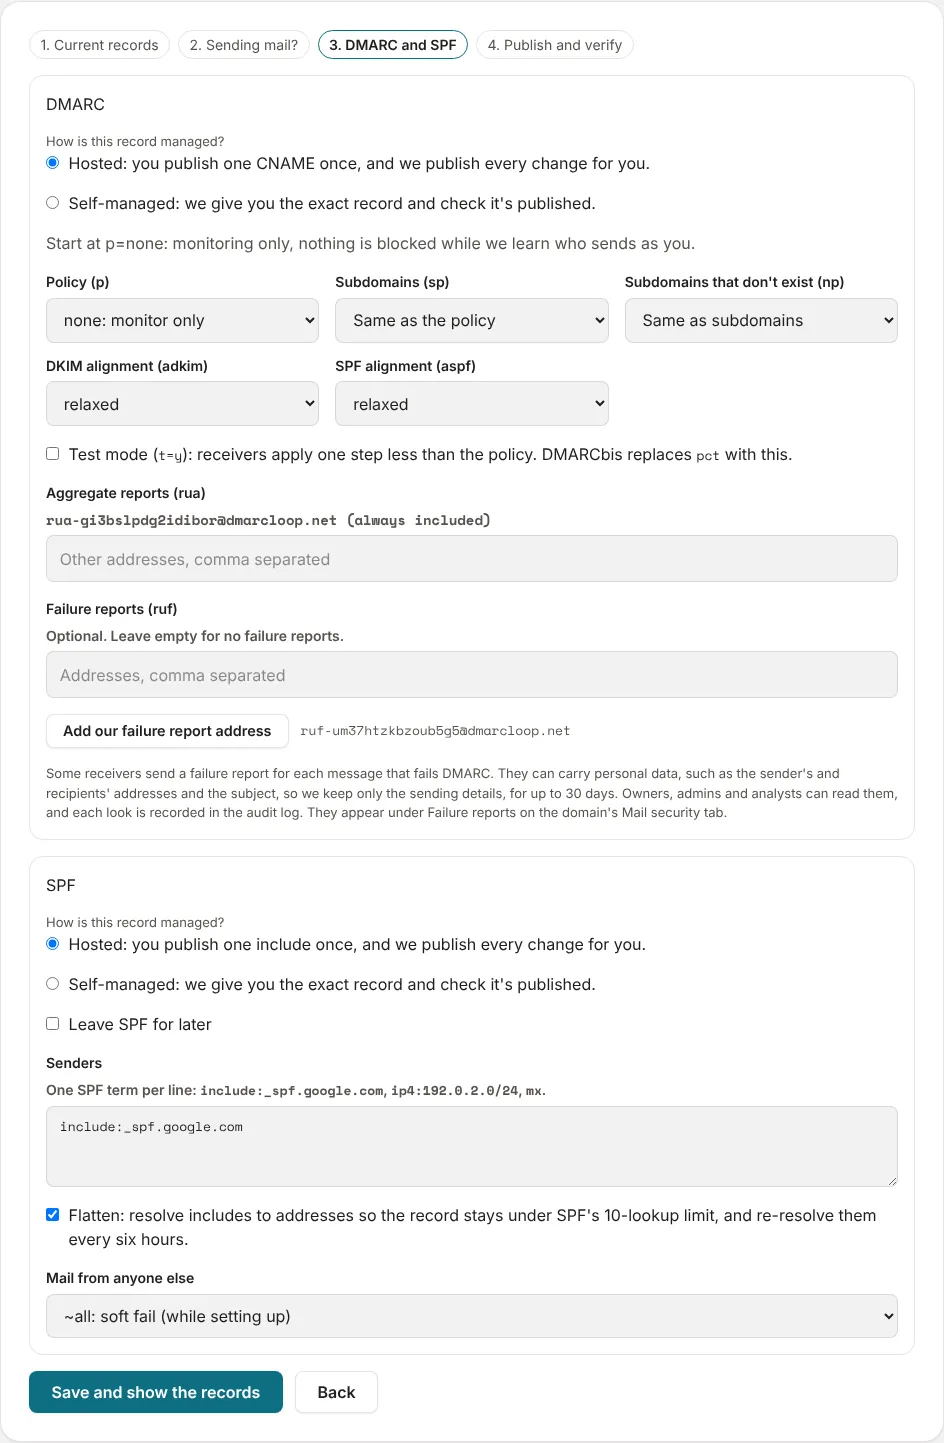
DMARC. If the domain already has a record, the wizard keeps it: same
policy, same other report addresses, with ours added. If it has none, it
starts at p=none: monitoring only, nothing is blocked while we learn who
sends as you. Your report address is always included and can’t be removed
here; Other addresses adds anyone else’s. Failure reports (ruf) is
optional, and empty unless your record already had one; see Failure reports before
adding an address, since those reports carry personal data. The other fields
(subdomain policies, alignment, Test mode) are covered in
the 14-day review; leave them as they are to start.
SPF. Senders lists one SPF term per line, prefilled from your current record or from the provider we recognised. Flatten keeps a hosted record under SPF’s ten-lookup limit (see SPF and the ten-lookup limit). Tick Leave SPF for later to publish DMARC on its own.
Choose Save and show the records.
4. Publish and verify
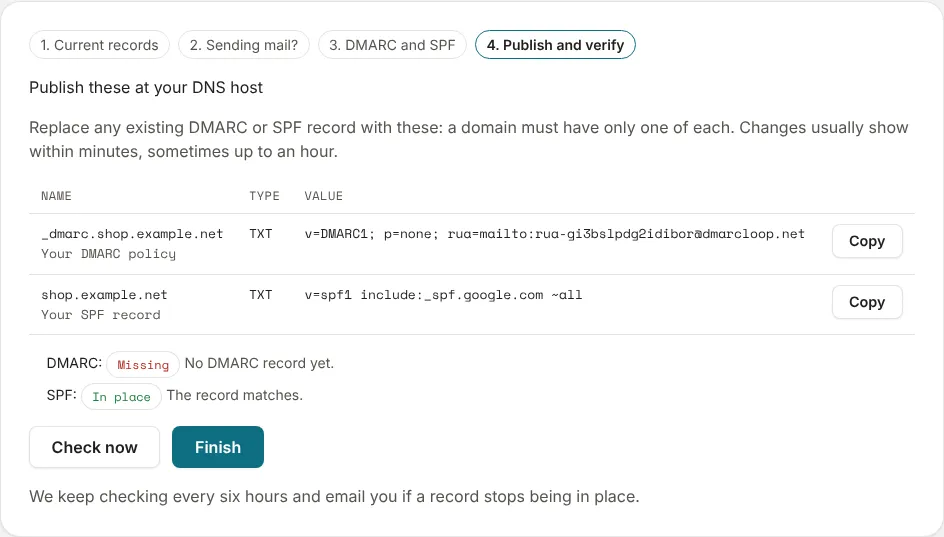
The last step lists the records to publish, each with a Copy button.
| Record | Self-managed | Hosted |
|---|---|---|
| DMARC | TXT at _dmarc.example.com: v=DMARC1; p=none; rua=mailto:rua-…@ |
CNAME at _dmarc.example.com pointing at ….dmarc.h.dmarcloop.net |
| SPF | TXT at example.com: your SPF record |
TXT at example.com: v=spf1 include:….spf.h.dmarcloop.net ~all (it replaces your SPF record) |
Replace any existing DMARC or SPF record with these: a domain must have only one of each. Two DMARC records, or two SPF records, and receivers ignore them all.
Once they’re published, choose Check now. Each record shows In place when we can see it. DNS changes usually show within minutes, sometimes up to an hour; you don’t have to wait on this page. Choose Finish to go to the domain’s DNS records tab. We keep checking every six hours and email you if a record stops being in place; see Check the records are in place.
Where to add them
Records are added wherever your domain’s DNS is hosted, which isn’t always the company you registered the domain with. A domain bought at one registrar can have its DNS served by Cloudflare, by your web host or by Microsoft 365. Adding records at the registrar when someone else serves your DNS is the most common way an afternoon gets wasted. The free Domain Checker shows your domain’s name servers, which usually name the company.
Cloudflare
- Sign in at dash.cloudflare.com and open the domain.
- Choose DNS, then Records, then Add record.
- Choose the type (TXT or CNAME). In Name, enter only the part
before the domain:
_dmarcfor DMARC,@for SPF. - Paste the value into Content (Target for a CNAME) exactly as shown.
- For a CNAME, turn the proxy off (DNS only). Leave TTL on Auto.
- Save. Cloudflare publishes within a minute or two.
GoDaddy
- Sign in, open My Products, and choose DNS next to the domain.
- Under DNS Records choose Add New Record.
- Choose the type. In Name, enter only
_dmarcfor DMARC or@for SPF. - Paste the value with no surrounding quotes: GoDaddy adds its own.
- Leave TTL at the default and save.
Microsoft 365
If your name servers end in dns.microsoft, your DNS is managed inside
Microsoft 365.
- In the Microsoft 365 admin center choose Settings → Domains, then the domain.
- Open DNS records and choose Add record, then the type.
- Enter
_dmarcfor DMARC or@for SPF, paste the value and save.
Anywhere else
Find the domain’s DNS records (sometimes called the zone, DNS management or
advanced DNS) and add each row. If the panel adds the domain to the name for
you, enter only the part before it (_dmarc); if it wants the full name, enter
it as shown. Paste each value exactly, and let the panel add any quotes.
Mistakes that are easy to make
- A doubled name. Typing
_dmarc.example.cominto a panel that appends the domain publishes_dmarc.example.com.example.com. Enter_dmarcalone. - Two records. Edit the existing DMARC or SPF record instead of adding a second.
- Extra quotes, or a value cut short when pasted. Compare what you published with the wizard, character for character.
When someone else looks after your DNS
You don’t need to give them an account. Send them a link to the domain’s records instead.
Share these records, under the wizard and on the domain’s DNS records tab, makes a read-only page of that one domain’s records: each record’s name, type and value, what it is for, and whether it is in place. It has its own Check now button, so whoever publishes the records can see that they took. The page shows nothing else about your account, isn’t indexed by search engines, and needs no sign-in. It needs the Admin or Owner role.
- Create link: choose how long it Works for (3, 7, 14 or 30 days; 14 unless you change it) and copy the link. It is shown once.
- Email these records to someone: enter any address and choose Send. They get an email listing the records by name, with a link to the page for the values. Each organisation can send 20 of these a day.
- Active links lists every link that still works, who made it and when it was last checked. Revoke stops one straight away.
Anyone with a link can open it until it expires or you revoke it, so send it only to the person who needs it. Making, emailing and revoking a link, and every Check now on its page, are in your audit log. Check now can be used once every 15 seconds and 20 times an hour per link.
After a bulk import, Email these records to someone under the results sends one email with a link for each imported domain, up to 50 at a time.
To hand over every domain at once, Download DNS records sheet on the Domains page, and DNS records (CSV) on Exports, are a sheet of every record your domains need, with what each is for.
Next
Stuck? Reply to any email DMARCLoop sends, or contact us — a person reads it.